Just like with good old paper letters, it is
preferred to leave a signature when sending an official email. Aside from the image/logo it lets
people know: your name, and your position in the company, in some cases, even contact details or
social network links are included so people can get in touch with you through other
communication channels. Let’s find out what makes a good email signature and how to create a
signature in different apps/services.
What makes a perfect signature?
Most companies have their guidelines for how
the signatures should look and you usually get it with your brand-new mailbox, but what
principles to follow if you need to create one from scratch? The signature has to be simple,
legible, and efficient, no matter if it is a personal email signature or you are communicating
on behalf of a company without your name attached to it.
Though it may seem obvious there are many examples of how it shouldn’t be done. We are here to
discuss how it should be done.
-
Obviously, you want to include your name and last name
It is polite and you want the other person to know who they are communicating with.
There is no need to include an email since it is displayed by the email app anyway.
Consider whether the phone number must be included, anyone who has it will be able to
contact you which isn’t what you always want.
-
Do not include any “funky” fonts, gifs, or too many social media links
In other words, do not go overboard with promoting yourself/your company and with
stylistic elements. The same goes for colors and an abundance of different fonts, using
colored Comic-Sans and Papyrus fonts together is a perfect example of going overboard.
If the company has its own visual identity, it’s best to stick with it. The only
exception to this is a company logo, which must be present in every good signature.
-
Keep the signature short and professional
“The more, the better” doesn’t apply here, if you include too much info, it may be
distractive and unappealing so three or four lines should do the trick. Avoid including
details that are too personal or unprofessional, it might be anything- a photo of you
and your family, a link to a personal Instagram page, or favorite movie quotes.
-
Verify that the signature is displayed correctly on various platforms
The last thing you want is a signature to be displayed incorrectly (due to the different
display sizes). Or even worse, as a bunch of broken HTML code which equals not having a
signature at all.
We could continue the list but it’s best to take a look at some good and bad examples around the
web, apply your own visual identity, and stick with these basic rules, the rest should be
child’s play.
Creating a signature
As we already mentioned, the signature can make or break your professional emails. Without them,
we can’t imagine official emails and nowadays a well-structured signature is a must. Let’s see
how you can create a signature in Outlook, eM Client, and Gmail.
How to make a signature in Gmail
Gmail is a web-based app, it has always been web-based but that gives it a few advantages. One
of them is that you can create a signature and the apps that support signature sync will
download it, no need to set it up in every app separately. Let’s take look at how you can create
a Gmail signature from scratch.
Start with logging in to your Gmail account, then look for the gear icon in the top-right corner
of the Gmail Inbox page. Clicking this button will open a drop-down menu with quick settings,
and to get to the main settings you need to click the “See all settings” button. Once you
are in
the actual “Settings” of Gmail scroll down in the “General” section until you see
“Signatures”.
The rest is pretty straightforward, name a new signature, add the text, image, and links using
the text editor, then set the signature use conditions. Once you are done, hit “Save
changes” at
the bottom of the settings list and that should be it. It is worth noting that you can have more
than one Gmail signature template, and each signature is limited to 10 000 characters.
How to make a signature in Outlook
If you are using Outlook and wondering how to create a signature, we hope to help you with that.
- To create a signature, launch the Outlook app and open a new
message. In the new message window, go to the Message menu in the top toolbar, select
Signature, then Signatures
- When Signature settings are opened, look for the “Select
signature to edit” section and below it, you should see the “New” button
- Click on “New” and compose your signature, set it as
default
for the respective account, and/or set it as default for replies and forwards too. When
you’re done, hit the “OK” button to save the signature
- If you would also like to know how to change email signature
in Outlok, it’s very easy. Click on the signature button in the compose window and pick the
signature
“Ok, but how to edit my signature in Outlook?” To edit existing signature navigate back to the
signature menu, select the signature you’ve previously created and you can edit it below in the
“Edit Signature” section. Hit the “OK” button again, to confirm the changes and
that should be
it.
To remove the signature, select one of your signatures, and click on “Delete” below the
“Select
signature to edit” section.
How to create signature in Outlook 365
If you prefer Outlook 365 to a classic desktop Outlook, this part of the article is just for
you. Similar to Gmail, the settings are located in the top-right corner, it’s also a gear icon
and you also need to click on a button to reveal the complete settings list. In this case, it is
the “View all Outlook settings” button.
Then open the “Compose and Reply” section and you will see the “Email signature”
there.
Unlike Gmail, Outlook 365 allows only one signature per account but otherwise, you can find an
almost identical set of formatting options for your signature. That’s not necessarily a bad
thing as it keeps things intuitive and there’s not much you need to create a basic signature.
The conditions for signature use are present too so you can control when the signature will be
appended when it will be left out or whether you want to add it manually.
Not sure how to make a pretty signature? Try email signature
generator!
Whether you need inspiration or you just want to see how the final signature will look like when
it’s sent, free email signature generator can help with that. Not only that, it might save you
some time which those with busy schedules surely will appreciate. We picked signature generators
that stood out just for you.
Gimmio signature generator - Great features but a lot of
them are paid and you
are
limited to only one signature. Only pre-defined templates are available without registration, if
you want to create a custom template you will have to sign up but the signature export doesn’t
require any account.
Signature.email - Offers a lot of minimalistic
templates with a clean
look and you can also create custom templates without registration. The clean and intuitive
interface is also a nice bonus. The final signature can be sent to your email or copied to the
clipboard, but only after completing account registration. If you don’t need that just select
the text and use good old copy/paste.
MySignature - Templates in this generator are more
colorful and
diverse. They are also separated into the categories- Friendly, Professional, Modern, Elegant,
and Creative.
Some of the templates are locked behind a paywall which limits the choices but there are still
plenty of free templates to pick from. If you can’t pick any of the available templates, a blank
canvas template is available too. Signatures can be only copied/pasted from the website if you
are a free user.
Hubspot - This tool has a lot of
features and
it will even notify you if some important fields are not filled or the data are incorrect(e.g.
Wrong email address format).
The interface is sleek, templates are clean and professional but in order to get a signature you
just created it’s necessary to specify the website of your company and how many employees it
has. It is not a dealbreaker but other services do not require this.
How to make a client signature in eM Client
eM Client offers a lot of customization options and the signatures are no exception to that. In
this part of the article, we are going to take a closer look at the signatures feature in eM
Client and how to make your perferct eM Client signature.
Navigate to the eM Client Menu and click on Settings. Proceed to Mail and
open the Templates and signatures section. As the name may suggest, this section
is split into two - Mail Templates, and Signatures. To get to the signature
editor, click on the “Signatures” button and a
new window will appear.
In the signature editor click on the “New” button, name the signature, and insert or type
the
signature in the text field below. You can add almost all the formatting you can think of and
make the signature pop. With the signature completed click on the “Save” button to
preserve the
changes.
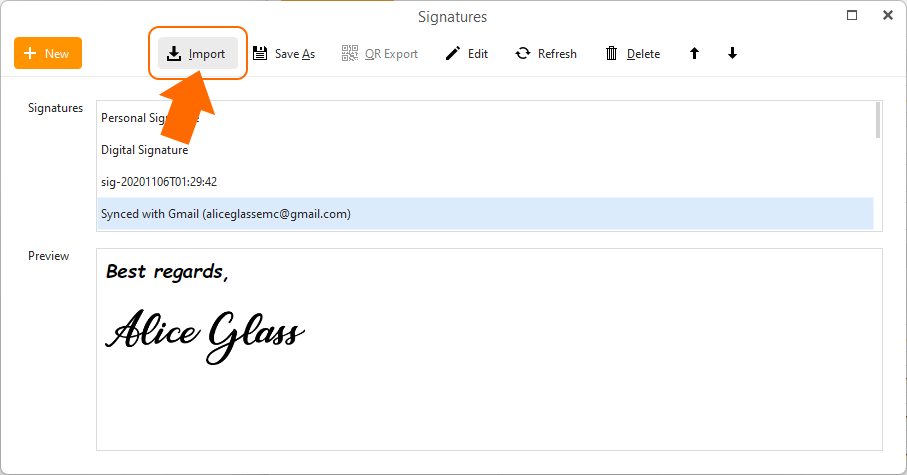
If you already have a signature in an HTML file it can be imported using the “Import”
button and
in case you have signatures in Gmail or Exchange accounts, eM Client can even sync those from
the server so your existing signatures don’t have to be transferred as long as you are using
Gmail or Exchange with eM Client. Apart from the import and signature synchronization, you can
save your signatures that were composed in eM Client, just click on the “Save as” button
in the
signature editor and save the signature as an HTML file.
 eM Client add signature
Back to the “Templates and Signatures” settings because there are still a few things to
cover.
In the “Signatures” section you can select which signature you want to use with a
specific
account. Whether you want to use a different or the same signature with each of your accounts,
you can also set different account signatures for new emails, replies, or forwards, it’s all
possible just in case you would like to have different signatures for different scenarios.
If you want to keep things simple, you can leave these settings at their default values and pick
the signature for a new email from the list when composing the message.
Don’t hesitate to give eM Client a try and if you are already using it, we hope you found this
article helpful and informative.