Are some of your accounts syncing a lot of old unnecessary emails? Worry not, there’s a solution to that in eM
Client called “Limited time sync”. Set the time-limited synchronization to a preferred period of time to
synchronize only the messages that are still relevant.
What are the benefits and limitations?
Enabling limited time sync can help with speeding up the initial synchronization due to the lower number of
synced items, reduce the space taken on the disk because fewer emails will be stored in the eM Client database.
This will also speed up the overall functionality of the application, especially when browsing through your
folders or using search. And if you are using metered connection, it will reduce the data usage so you won’t run
out of the data limit if you are not at your home Wi-Fi.
It is worth noting that by limiting the number of downloaded messages you will need to sync older ones “on
demand”. Older messages can be synchronized additionally but these can be accessed only with an active internet
connection, which in office environments is not that big of an obstacle. However, if you are mobile and want to
do some work with eM Client while offline it’s good to consider setting a broader sync period if you might need
to check older messages. The local search will ignore additionally synced messages which can be worked around
(as long as you are online) by using the server-side search.
If you are constantly online and you are certain that all messages you need are included in the specified sync
period, you might not even notice any of these changes to normal eM Client functionality.
Setting up Limited Time Sync
You already have a general understanding of what limited sync does so now it is time to set it up.
If you are adding a new IMAP or Exchange account to eM Client, the limited time sync setting can be found at the
last step of account setup under the “Sync options” section.
The default in the desktop email app is “All time” meaning that all the messages you ever received and
sent will
be available in eM Client.
If you would like to change the sync time period for the account that is already set up in eM Client, it is
possible to do so in Menu > Accounts. When in the “Accounts” window, select the account and go to
“IMAP” or
“Exchange Web Services” depending on the account type.
Then look for the “Sync Options” section and set “Message sync time period” to one of the offered
options - a
specific number of days, weeks, months, and up to one year. Should the option synchronize too few or too many
messages, you can change it in the account settings at any time.
Check out the video on this feature below:
How to use Limited Time Sync
This feature will limit the number of synced messages but it might happen that older messages are needed for
something. Where to find them, and how to sync them?
Once the limited-time sync has been enabled go to the message list and if you have numerous messages, scroll to
the bottom of the message list. At the end of it, you should see the “Load more” button. This button
allows the
loading of even older messages. Each click on “Load more” should add approx. 7 more days' worth of emails so you
will not lose access to other messages with limited time sync enabled.
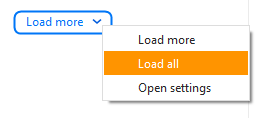 eM Client: Load more button with Load all option
In case you need to browse through all your messages for any reason, you can also set eM Client to quickly
synchronize all messages in the given folder - use the arrow in the Load more button to find the ‘Load
all’
option or even a direct link to this account’s sync setting to change your default synchronization quickly.
New to eM Client?
Try it out! It's free and fabulous.
If you’re ready for more, buy the PRO license and enjoy:
And in the meantime, check out our YouTube channel for how-to videos.