Almost everyone has multiple email accounts. At a minimum, you probably have at least one personal email account and a work email account. Navigating between several email accounts at once through webmail just wastes time - you can add multiple email accounts to your eM Client application! Quickly switch between accounts without worrying about remembering your login information every time you need to see new emails or manage your tasks.

How to add new email accounts in eM Client
Adding a new email account on eM Client will only take a moment. We’ll walk you through the basic steps:
- If you just installed eM Client and it’s your first time using the application, you’ll be able to set up your new account right away.
- After you’ve set up your initial account and you’re ready to add the next one; click eM Client on your computer’s toolbar.
- Windows users: Menu > Accounts, click Add Account
- macOS Users: eM Client > Add Account
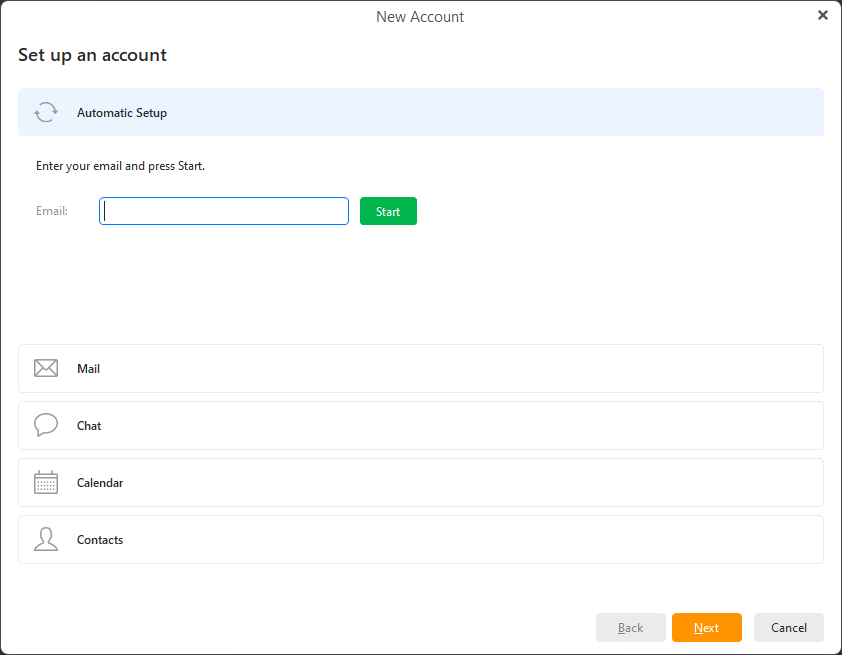
- Choose your account setup option. You’ll have the choice of automatic setup, or manual setup.
- The automatic setup is the easiest option because your settings are automatically detected by the application. Automatic setup chooses the recommended mail protocol for you; either IMAP or EWS for most up to date services. If you require a specific setting, you might need to use manual setup.
- Manual setup is great for users who have a non-standard setup on their device or server. Manual setup lets you choose specific protocols that will be compatible with your email account. You can change the specific settings for mail, chat, calendar and contacts based on the needs of your system.
 eM Client: New account setup
After deciding which option is right for you, click “Next” when you’re done. You can always return if you change your mind before finishing the account setup process by clicking “Back.”
-
You’ll be asked to provide your email address. If you’re adding an account without OAuth (authentication in a separate window), you’ll also need to add your password.
-
Add your full name and check your email address for the “Account Details” page. “Your name” is what recipients will see when you send them a message from the eM Client application. Additionally, you can name your account for your own personal use. Recipients will not be able to view your account name - only you. When you’re ready to move on, click “Next.”
-
It’s time to set up encryption. You have three options: Create encryption keypair, Import existing PGP keypair, or Continue without encryption. Your messages are safe regardless of your security choices; eM Client was designed to include enhanced security measures to protect your information. However, setting up encryption is recommended only because it adds another layer to keep your messages secure. To learn more about email encryption, read our encryption guide here.
-
If you choose to create a new PGP keypair, the next page will have you set it up by creating a unique password.
If you choose to import an existing keypair, you’ll be asked to select it from your device in a new pop-up window.
Users who choose to continue without encryption will simply continue to the next step for account setup.
-
Almost there! Choose your avatar using a default image, or an image from your computer. Avatars can also be selected if you have a domain icon or Gravatar connected to your email address. Next, select the services you’d like to use that are supported by your server. The final step is to set your sync options. Click “Finish” and you’re done.
After you click “Finish,” it is likely that you’ll be asked to quickly grant eM Client access to add your email account to your eM Client application. This step is only for email providers using OAuth - such as Gmail, Outlook, Microsoft 365, Yahoo, and AOL.
Once the process is complete, you have the option of adding additional email accounts to eM Client by navigating to: Menu > Accounts. Your accounts will remain in your eM Client application panel; so you don’t need to switch screens or spend time logging in and out of multiple email accounts. To navigate to the desired email account, click one of your email addresses or account names shown in the left toolbar. If you click the email address, you’ll be shown your inbox. Once you’ve added two or more accounts; favorite folders will appear at the top of the list. This will include global folder options. Check out our blog post to learn more about special folders. They’re easy to use and keep your messages organized!
What email providers can I use with eM Client?
Users have plenty of free and paid email provider options to use that are fully compatible with the eM Client application. Popular free mail providers include Gmail, Outlook, and Yahoo. Sync your calendar, contacts, and messages. You can add accounts from different email providers on your eM Client application, so there’s no need to worry about your providers clashing or getting mixed up.
Paid email providers including Exchange/Office 365, Icewarp, Imageway, and Google Workspace are able to use full synchronization of all the great features offered on their accounts - plus more! Explore the full features offered for each type of email account here.
How many email accounts can I add to eM Client?
If you are currently using our free version of eM Client; you can only add two email accounts. If you upgraded your license to PRO, you can add one additional email account or one thousand - there’s no limit! Each email account you add will have access to the full benefits and features on eM Client. Organize and view each account and their folders, calendars, tasks, and more. eM Client was designed to make it simple for users with multiple email accounts to manage their messages and tasks all in one place. Easily differentiate between your accounts using avatars, and customize each account with folders and tags to keep your information organized.
The ability to add and manage multiple email accounts to one application is just one of the many benefits of using eM Client! Learn about all of the great features you can use with your added accounts by reading our blog.
New to eM Client?
Try it out! It's free and fabulous.
If you’re ready for more, buy the PRO license and enjoy:
And in the meantime, check out our YouTube channel for how-to videos.