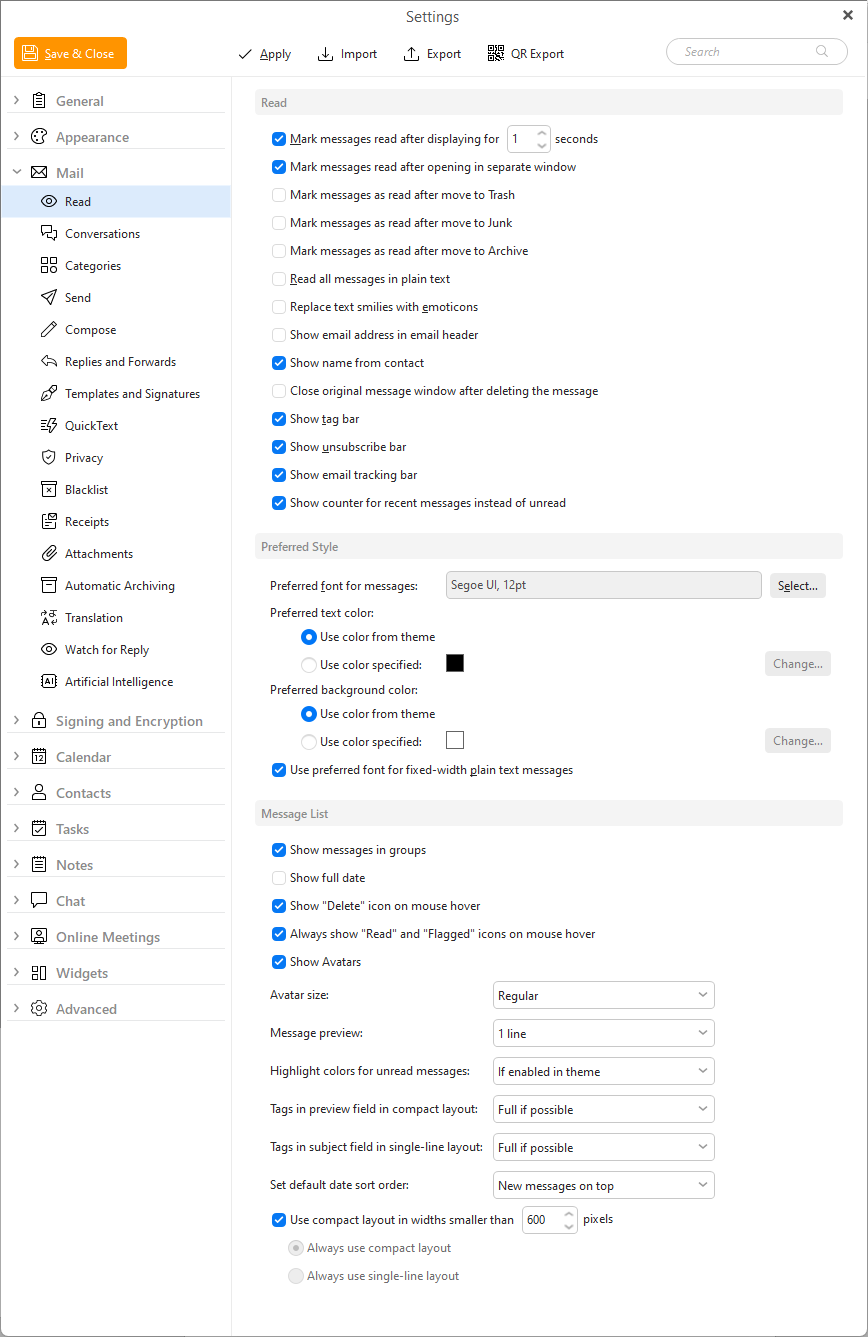
The Read Settings window. In this section you can specify everything about the way you view your messages.
The application tries to track which emails you have read and which you haven't by marking an email as "read" after it's been opened for a certain amount of time. You can specify the amount of time in seconds in the numeric field after which you would wish to mark the currently opened email as "read".
The application will mark messages as read after opening them in separate window.
This setting will mark messages as read when they are deleted in the application.
This setting will mark messages as read when they are moved to Junk (or Spam) folder in the application.
Check this box if you wish all incoming messages to be displayed in plain text format.
Check this box if you wish to replace text smilies with emoticons/emoji.
Check this box if you want to have the email address displayed in the email header in the message view.
With this option, the name in your opened message will be replaced with the name stored in your saved contacts, in case the name in the message code itself is different.
If you check this option, the original opened message window will be closed when you delete the message. If you leave this option un-checked, the original opened message window will still remain.
Check this box to show tags in the Message detail header.
Check this option to show the unsubscribe link contained in the message header.
This option is for the info line in the message preview informing about the email tracking pixel inside the given message.
This option will show a red counter next to your folders and category tabs if there are new, unread messages that just came in. After you open the folder, the number is again replaced with full number of unread messages.
Set a style you wish to have your plain text emails to be displayed in.
Click "Select" to choose a preferred font for your plain text emails to be displayed in.
Click "Change" to choose a preferred text color for your plain text emails to be displayed in. Or use the default for the selected theme.
Click "Change" to choose a preferred background color for your plain text emails to be displayed in. Or use the default for the selected theme.
By (un-)checking the very last option in the window you can enforce using the mono-space font for pre-formatted plain text messages.
Check this option if you want your messages to be displayed in groups. Your messages will be now sorted in groups like "Older" , "Two weeks ago" etc.
If you check this option, the full date of receiving your message will be displayed (including day, month, year and exact time instead of the default day and month)
This setting will show a Trash/Delete icon on each message in the message list when you hover over it, making it easy to delete it using a mouse.
This setting will determine if only read indicator or flagged button are shown or both will be available with Avatars enabled.
This setting will either show or hide all avatars in message list, this will not change the Columns configuration though.
Avatar size in the message list can be set to Regular or Small.
Message preview can be disabled or set to 1, 2 or 3 lines of the message text.
This setting will use different colors for background and text of Unread messages, making them stand out more in your message list.
When viewing tags in the preview field in compact view you can select to see Full if possible to see the full names of the tags or Icons only to save space.
You can view tags in the single-line view Full if possible, Icons onlyor Don't show the tags at all.
You can choose whether you want your message to be displayed on the top or on the bottom from the drop down menu:
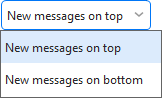
In addition there is also the Preserve current setting option, which is selected by default. This option preserves current setting, which means that the settings which you have for various mail folders will be preserved. But on the other hand if you for example choose New messages on the top option in this section, the setting will be changed for all your message folders.
Here you can customize your compact layouts by selecting the number of pixels. You can also uncheck this option and then select one of the 2 options:
Always use compact layout
Always use single-line layout
This way you can have the same layout no matter how thin or wide the message list is in the current window.